
Koinos Supercharger Event (Calling All Coders!)
1781 Registered
Allowed team size:
1 - 7
1781 Registered
Allowed team size:
1 - 7
This campaign is over.
hackathon
Online
starts on:
Jul 10, 2023, 07:00 AM UTC (UTC)
ends on:
Sep 07, 2023, 06:59 AM UTC (UTC)
Learn Koinos
INTRODUCTION - CLICK HERE FOR THE FULL MODULE
In this module, we'll give you the knowledge needed to launch a dApp in 7 days on the Koinos Blockchain. You will be able to create the smart contract, the backend and front end and tie it all together using Koinos Pro a service that simplifies your development process.
Read more about it on our 7 Day Dapp Challenege Blog
Why Blockchain?
Not all blockchains are the same which means each blockchain offers their own unique properties. Blockchains like Bitcoin are designed to only transfer tokens, while Ethereum offers the ability to create smart contracts, yet both leverage an immutable ledger.
dApps need two main properties:
-
Immutable Ledger - Immutability ensures that everyone is able to verify the global state. No one can argue unversal truth when all transactions are recorded on chain that cannot be tampered with. Users can always verify ownership and trust is not required.
-
Smart Contracts (dApps) - Developers can customize the specific conditions required to achieve a deterministic outcome. Combined with Web2 principles, dApps offer users discreet advantages when using Web3 applications rather than Web2.
But this is not enough. What if someone could shut down your dApp by banning your application? This is why blockchains must also be provably decentralized.
Decentralization ensures that the ecosystem stake holders are proportionately equal and no single entity can change the fate of anyone elses.
That's great, but why should I build on Koinos rather than any other blockchain?
Koinos contains all of the properties that make it decentralizated blockchain suitable for dApps. But it also offers several distinct advantages that make it the #1 place to build dApps.
-
No onboarding necessary - Koinos dApps don't require gas fees, meaning new users don't have to figure out how to acquire tokens to pay fees. Users can get a wallet address and start using dApps immediately.
-
dApps don't compete with the blockchain - Fees cause token holders to have usage anxiety. Should token holders speculate and hodl? Or spend the token to use the dApp? Since the Koinos Blockchain is free-to-use, dApps aren't competing with the blockchain for tokens. Additionally, when the value of $KOIN increases it doesn't impact usage anxiety because tokens are never lost to transaction cost.
-
Build in common langauges - Koinos supports any language that can compile to WASM such as the tremendously popular Typescript. If you already know typescript, you can build a dApp in your spare time without needing to learn yet another language.
How this example can help you launch your dApp
Without the need for users to buy tokens, ordinary people can try blockchain applications for the first time with zero risk and zero signup. Our 7-day-dapp example is designed to show you how to leverage the full power of the Koinos Blockchain. This dapp will not require players to hold any tokens whatsoever and it will also issue them tokens which they can immediately use.
We hope you take this example and use it to build turn your dreams into successful dApps. For more support, please reach out on the official Koinos Discord
PHASE 1: THE IDEA & THE SKILLS REQUIRED
While it is acceptable to build a niche dApp, we suggest you begin with a general idea to cover the widest range of possible users. Focus on the user's perspective and their experience and improve using their feedback!
Remember, if you can't explain it simply, then you don't understand it well enough! If you find yourself in this position, simplify your idea and try again.
Let's start!
DEVELOPING THE IDEA:
For this module, we'll be creating a game dApp called called Fact or Fiction.
The User Experience:
At the end of the game, there will be only 1 winner who will recieve tokens as a reward. The user won't have to know what cryptocurrency is, nor will they need to hold any tokens to begin. The user will need to install Kondor Wallet to begin.
The game will starts with a simple question with two choices only, Fact or Fiction. If the user selects the wrong answer, they are eliminated, if they select the correct answer, they move on. The questions have varying difficulty and the last player standing wins.
ASSEMBLE THE DEVELOPMENT TEAM:
When assembling the dev team, make sure you keep the idea simple. You'll need 3 main skills to be able to complete this challenege. If you are not a technical co-founder, don't worry you can still assemble the team because you've kept your idea simple and easy to explain!
Here's the basic skills you'll want to seek out in your potential team:
Frontend
Front end development will require someone with an understanding of basic Web2 development. They should know javascript and frameworks like react, angular or similar. Their goal is to create the wireframe which can interact with the backend and the smart contract entry points.
Backend
There is a huge variation in how backends can be created. For this example, we'll keep thing simple by using a serverless design via SupaBase. We won't cover the exact method because your flavor of backend will vary. However you will need someone who understands how to handle backend services or be prepared to build their own backend server. No Web3 knowledge is necessary to do this. It is also possible that you create your entire dApp without a Backend and leverage Koinos Blockchain as the backend. This is how dApps like BurnKoin and KAP operate.
Smart Contracts
Smart contract development is often the easiest part! The smart contract developer on Koinos must have knowledge in Type Script so they can install and use the koinos-sdk-as-cli. See Developer Modules for more information.
ARCHITECTING THE USER EXPERIENCE
The main focus of the architectural phase is to develop the user experience (UX) and loosely define how the supporting back end (middleware and smart contracts) functions. Remember that we do not need to discuss implementation details, but we must be able to define the user experience sufficiently enough to develop tasks and assign work responsibilities.
The entire team should be a part of this phase because everyone can provide feedback from their respective ends. Some ideas might be great but remember that you can always come back and iterate and add features during future development.
THE UX BEHIND FACT OR FICTION
While the user experience for our "Fact or Fiction" game will differ from your idea, we've provided the general UX that we developed during our architectural phase to help you understand how simple we kept it. You should aim to be able to explain your UX in just a few simple steps too.
-
Players enter the website and see a countdown timer to the game start.
-
If they wish to play, they connect their wallet. No $KOIN necessary to play or receive rewards.
-
At the start of the game, they'll see how many players are remaining, the question, 2 buttons stating "fact" or "fiction", and how much time is left to answer.
-
After several rounds, the remaining player is the winner and automatically receives the in-game reward token.
Our written UX is then translated to a spiderweb using excalidraw.

Once the front end UX is generally understood, we can begin to discuss a critical decision process. What data lives on chain vs off chain?
KEEPING DATA ON CHAIN VS OFF CHAIN
Resources are much more available on Web 2 than on Web 3, so if this is your first time building on blockchain, it might be easier to just throw everything on chain however, you will often find that doing so makes your dApp inefficient and resource dependent.
Consider the following two part question:
"Do you need to recall data in the future?" If so,
"is it critical to your dApps unique value?"
For the Fact or Fiction game, it was possible to store all types of information on chain, including the questions, score keeping, and all types of metrics however none of these data points improve the UX that we previously described. For that reason, we decide that we would only store the winner's address on chain so we can highlight how data is stored and recovered on chain. In the future, we may use this data to create a historical leaderboard.
FRONTEND DESIGN
Since the UX is established, it should be easy to build the front end based on the UX. Avoid the pitfall of focusing on the aesthetics. Trust us, the users don't care as much as you think. Instead, focus on an easy experience for the user so they can quickly understand how to navigate your MVP. If you find time at the end of the building stage, you can go back and apply some aesthetics. This module will provide several drop-in components that will help speed up your front-end design.
Our developers were familiar with React, so that's the framework we chose to implement. There are many frameworks you can choose from so use what suits your team.
Our front end interacts with our game server (the middleware) which is connected to the blockchain via a RPC endpoint provided by koinos.io
BACKEND DESIGN
Each dApp will have a different backend requirement. BurnKoin for example, is entirely powered by the blockchain and contains no backend. Instead, all information is pulled directly from the blockchain. Some dApps might choose to use a serverless design and use Firebase or Supabase.
For Fact or Fiction, we decided on a serverless design to get our MVP shipped as quickly as possible. We will be using supabase to coordinate the front end with the smart contracts.
SMART CONTRACT DESIGN
Since we previously decided to only store the game winner, we opted for two smart contracts.
The Gamestats Contract
This contract is used to store the winning player's address on chain to be recovered in the future. It will receive data from supabase at the end of the game. Storing the game-winner allows us to create a future leaderboard but more importantly, it will demonstrate how to store and recall chain state.
The Token Contract
This contract initializes the game reward token and receives mint commands from supabase once the game is completed. The token contract will mint and issue the reward to the address stored in the game state contract.
KOINOS PRO
Now that we have a general concept of how the application will be structured, we'll need to quickly review how we communicate with the blockchain. Most Web2 developers are already familiar with the function and usage of an API.
Unless a dApp is maintaing their own node, they'll need to use an API service that is maintaining their own node. This is one of the many services provided by Koinos Pro. To sign up visit their website at http://koinos.pro. One of the first things you'll do is create an API key which can be done clicking Generate API key.

NEXT STEPS
The next step is to begin the build phase. By now, you should have developed a basic idea that was sufficient to build a team upon. Together, the team should have developed the idea by working backward with the user outcome to create the user experience. With the UX, the development team should be aware of their work responsibilities and tasks.
Although it is possible that 1 person has the skill to perform all of the work, it is advisible to have atleast 2-3 people to help complete this project.
With the team assembled, its time to get everyone into a room and start architecting the dApp, which means developing the user experience (UX), so you can build tasks and assign work responsibilities.
Introduction To Front End
The front end of a (dApp) is a crucial component in reaching and engaging users. It serves as the most recgonizable portion of an application, making it an essential component for successful user adoption. The front end not only enables users to access the dApp but also contributes to branding and represents the quality of the overall product, for this reason it MUST BE SIMPLE!
When building the front end, the choice of framework is not as important as the proficiency and familiarity that the front end developer has with it. Using what you already know is crucial to launching a dApp in 7 days. React was selected as the framework due to our developer's experience and ease of development. You should use whatever framework is most familiar with your front end developer. There is no wrong option.
Pitfalls to be aware of
Spending excessive time on polishing the visual appearance at the expense of the core functionality can result in a great-looking website with a subpar product, which is not desirable for an MVP item. Additionally, the front end should avoid overwhelming users with an excessive amount of information. The MVP should be intuitive and easy for users to navigate.
To expedite the development process, it can be beneficial to emulate existing interfaces that are not specific to any particular application. This approach reduces development time by leveraging off-the-shelf components.
Mock Ups
Mocking up the front end is an important step before implementation. We used Excalidraw for quick front-end mockups. We started by throwing our ideas on excalidraw and iteratively simplified the design to create the most barebones version possible.
Focus on Immediate Clarity
When users use the application, they should be able to immediate understand how to interact with it. This is why the user only has to perfrom three actions, connect their wallet, select their answer and claim their reward if they win.
In summary, the front end of a dApp serves as the interface for users to access and engage with the application. It should prioritize functionality over excessive visual polish, avoid overwhelming users with information, and strive for intuitive user experience. Existing interfaces can be emulated, and mocking up the front end using tools like Excalidraw can expedite the design process.
Let's begin.
Mocking up the Front End
We used excalidraw to mockup our front end quickly. We began with more pages then we needed and quickly wittled it down to something that was barebones. Here's the images of how each screen looks like and their function.
The user will often hear of something and click a link. Once they arrive,, they should immediately know if they can interact with the application. Since the game operates on specific cycles, our goal was to notify them of the next game so they can come back.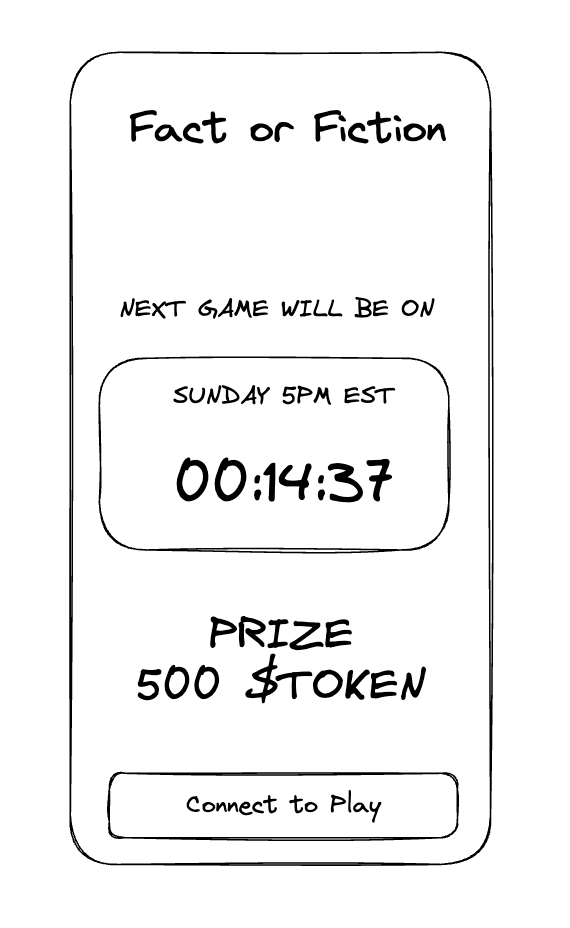
Within 1 hour of the game starting, the room begins to populate with users in the waiting area and there is a count down timer that gives the user a definitive start time. Once the timer ends, the game immediately begins.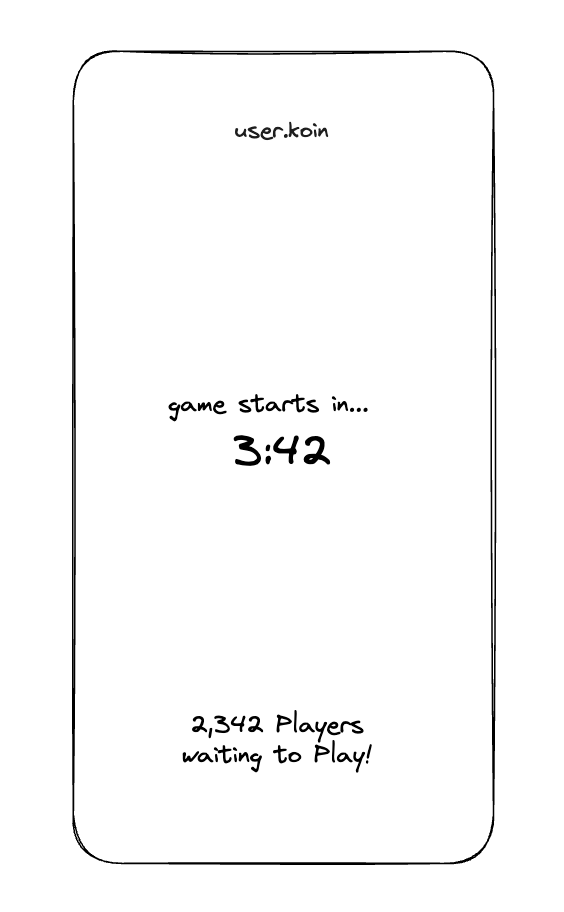
A question is displayed with two choices. Other bits of information include how many players are left and a count down timer starting from 10.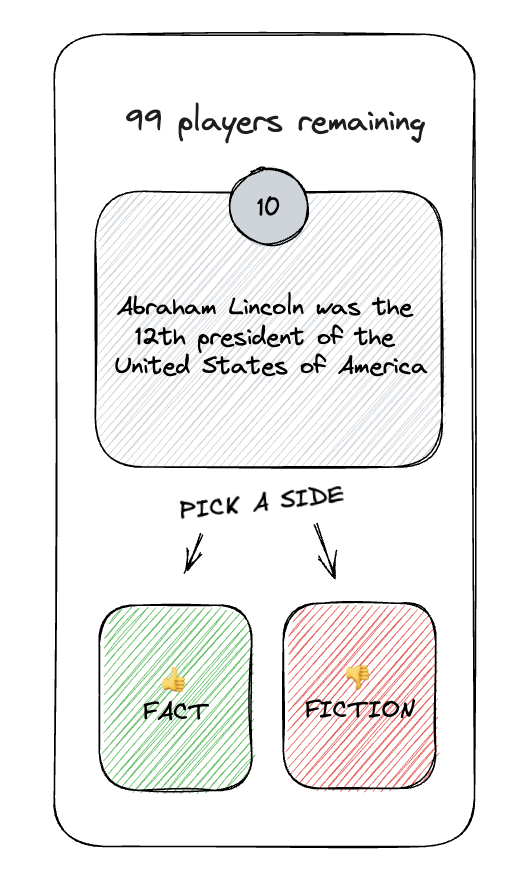
If the player selects the right answer, then they move onto the next question and the players remaining is updated.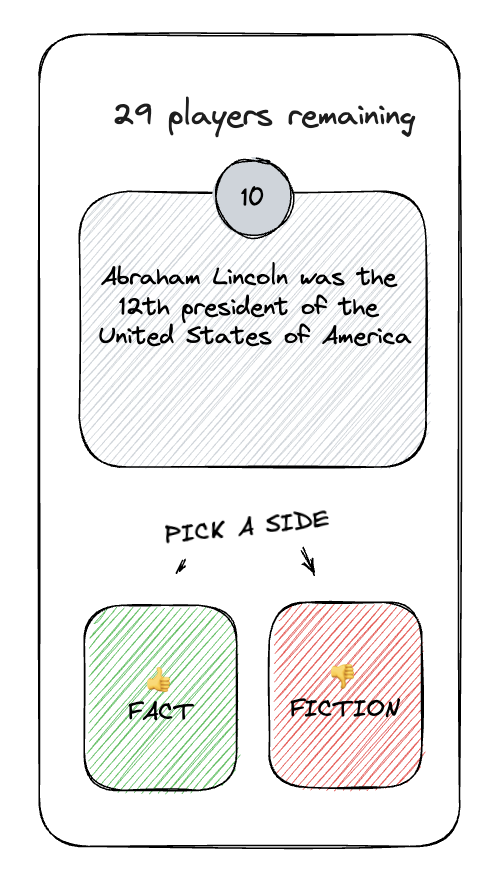
If the player selects the wrong answer, then they immediately get disconnected and observe the remaining game.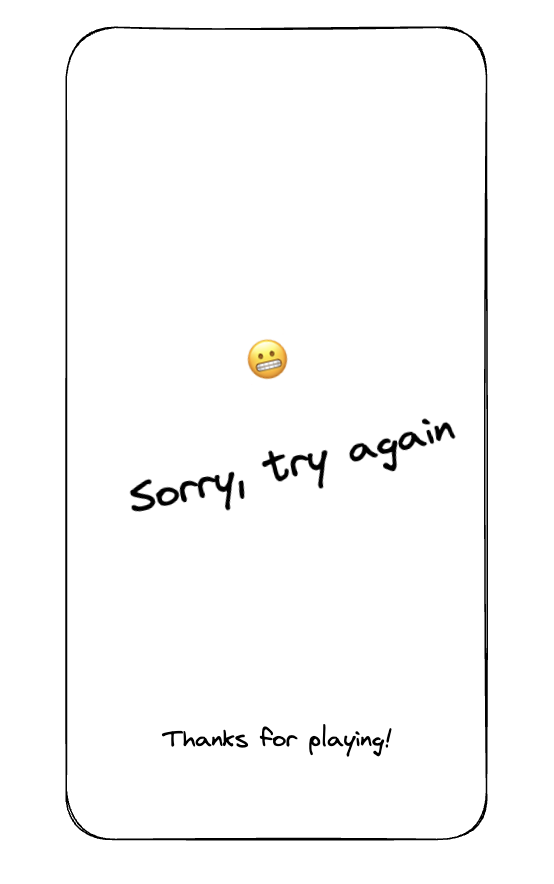
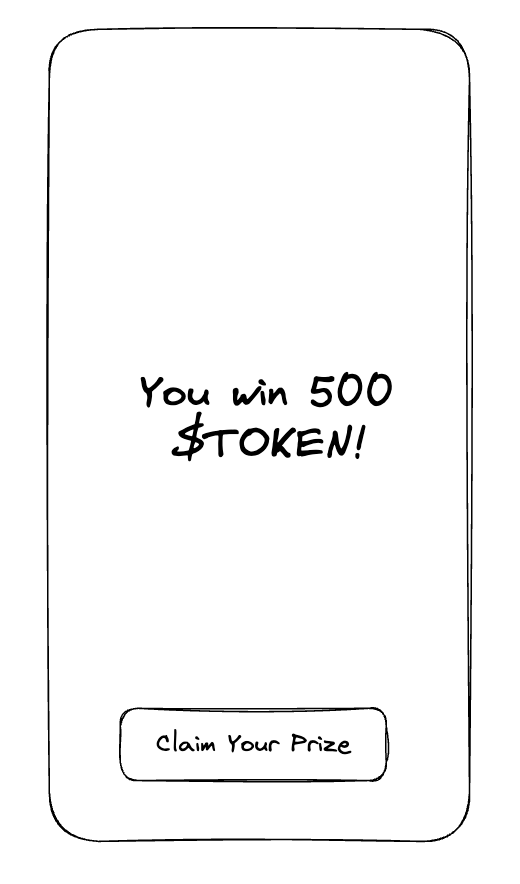
The last player standing gets a unique winners window that gives them the reward. Once the game is over, the backend to automatically updates the gamestats with the winner and their wallet address and when the winner clicks "Claim Your Prize" they'll collect the reward token.
Building the Front End Part 2
We used React and Chakra Components to quickly build a react front end.
The full code for our front end client can be found on our github repo
If you arent familiar with react, thats okay, the scaffolding of Fact or Fiction can be used to develop with other frontend frameworks. We'll brifely go over our work.
/client/components
We have several stock components that we built quickly with typescript react and chakra that are reused throughout our game pages.
AnswerOverlay contains the response to the player if they are correct.
CircleTimer is used for the countdown clock. This component uses the useTimer located in the /client/utils directory.
Header is a useful component that gives the player the ability to easily connect their wallet. This component is custom built to include the KoionsAccountConnector from the react-koinos-toolkit. This can help speed up your development process if you're using react, so we'll look into this component more deeply.
SitePreferences is another great tool that can give you darkmode.
VoteBar and Votebutton are also largely built from chakra and contains effects from the react package.
The main takeaway is that we tried to use existing tools as much as possible.
/client/pages
We have all of our working pages described earlier. The game page itself is found in play.tsx and contains the logic to communicate with our Supabase backend.
Backend with SupaBase
Introduction
For this demonstration we will use Supabase for storing centralized data and excuting edge functions. Although any modern backend system should suffice.
Supabase is an open source Firebase alternative for building secure and performant Postgres backends with minimal configuration. If you don't have an account you can sign up for a free account at the link above.
Getting started
First make sure to install Supabase
See the Supabase documentation for more info about Supabase CLI commands.
Run Supabase locally
npm
cd ./middleware

# Spin up Supabase
supabase start

# Stop Supabase
supabase stop
Deploy to Supabase
For this tutorial we are going to push our migrations directly to Supabase. For production environments we recommend setting up a CI pipeline like described here.
First create an account at Supabase and setup a project. Next login in with the CLI and link your project.
npm
# Login to Supabase
supabase login

# Link your project
supabase link --project-ref cotxdwwpcndxaijybcen

# Push db migrations to Supabase
supabase db push
Functions
Developing functions locally [Functions + env files]https://supabase.com/docs/guides/functions/secrets
npm
# Create a new function
supabase functions new my-function

# Run functions locally with env file + debug
supabase functions serve --env-file ./supabase/.env.local --debug

# Deploy a function to Supabase
supabase functions deploy submit-game-stats

# Deploy all our created functions at once to Supabase
npm run deploy:functions


# For Production copy env file
cp ./supabase/.env.local ./supabase/.env

# Deploy secrets to Supabase
supabase secrets set --env-file ./supabase/.env


#Secrets management
# View all secrets

supabase secrets list

#Set secrets for your project
supabase secrets set NAME1=VALUE1 NAME2=VALUE2

# Unset secrets for your project
supabase secrets unset NAME1 NAME2
Scheduling
- A cron-based Supabase edge function will query the
gametable each 5 minutes for scheduled games starting within the next hour. - It will create an
active_gamerecord 1 hour before the start of the game.
Join game
- User can join a soon to start game from the
active_gametable that hasn't started yet.
Updating game state questions
A cron-based Supabase edge function will run every X seconds and will update the active_game + game_question tables before each round:
- The
active_gamefieldsright_count,wrong_count+answerwill be reset androundwill be updated with +1. - A question will randomly be picked from the
questiontable, excluding questions already in thegame_questiontable for current game.questionwithinactive_gamewill be updated with the selected question. - A record will be inserted into
game_questionfor the new question.
Updating game state answers
A cron-based Supabase edge function will run every X seconds and will update the active_game + game_question tables after each round:
- After each question the
answer+players_remainingwill be updated. - When a winner has been decided
winner+pricewill be updated foractive_game.
Answering
- Submitting answers will be done through an api endpoint (edge function).
- It will check:
- Whether the player is still in the game by checking the
player_gametable for theroundandeliminatedfields. - If the user hasn't already answered the question by checking the
answersfield inplayer_game.
- Whether the player is still in the game by checking the
- If the player is still in the game and hasn't answered the question:
- The answer will be added to
answersinplayer_game. - If answer is correct the
roundinplayer_gamewill be updated to the next. - If the answer is wrong
eliminatedwill be set to true
- The answer will be added to
- After submitting an answer the right + wrong counts of the
active_gamewill be updated.
- It will check:
Client
The client will query active_game for any games starting soon.
- If 1 game has been found the app will start watching for changes of the
active_gametable. - If multiple games have been found the player can select a game from the list (later).
- A player can participate by connecting their wallet.
Database
Create migration
supabase migration new pick_random_questiongame
- Contains all scheduled + completed games. Serves as a history of played games.
- Participant count will be added once the game has been completed.
active_game
- App will watch game state to update the interface
- Used questions ids will be added to the game to prevent double questions from being picked
player_game
- State for app to watch for changes
- History for games player has played
game_question
- History of questions asked for games and their right / wrong counts.
GraphQL
Supabase automatically generates a GraphQL API. For this app it's restricted to queries only. Mutations have been disabled by revoking access for the postgres user anon and only granting select + trigger access. See the example below and the migrations .sql files.
postgresql
-- Restrict API access to query only
revoke all on table game from anon;
grant references, select, trigger on table game to anon;
Other
Eslint https://dev.to/devland/set-up-a-nodejs-app-with-eslint-and-prettier-4i7p
supabase functions serve --no-verify-jwt --debug
Enable realtime in dashboard: Database -> replication (active_game + player_game)
Generate Types
generate type mkdir schema supabase gen types typescript --local --schema public > schema/database.types.ts supabase gen types typescript --linked --schema public > ./schema/schema.ts
https://supabase.com/docs/reference/javascript/typescript-support#generating-types
npx better-supabase-types -i ./lib/database-supabase.types.ts -o ./lib/database.types.ts
Invoke functions
To invoke:
curl -i --location --request POST 'http://localhost:54321/functions/v1/' \
   --header 'Authorization: Bearer eyJhbGciOiJIUzI1NiIsInR5cCI6IkpXVCJ9.eyJpc3MiOiJzdXBhYmFzZS1kZW1vIiwicm9sZSI6ImFub24iLCJleHAiOjE5ODM4MTI5OTZ9.CRXP1A7WOeoJeXxjNni43kdQwgnWNReilDMblYTn_I0' \
   --header 'Content-Type: application/json' \
   --data '{"name":"Functions"}'
Debug functions:
supabase functions serve --debugCaveats
Realtime rate limits https://supabase.com/docs/guides/realtime/rate-limits
Deno https://deno.com/manual@v1.34.1/getting_started/installation
Prerequisites
-
Install the
koinos-sdk-as-clifrom MODULE 4: YOUR FIRST CONTRACT WITH KOINOS-SDK-AS-CLI -
Review databases from MODULE 6: LAUNCH A TOKEN WITH THE KOINOS-SDK-AS-CLI.
-
Review the usage of
google protocol buffers(akaprotobuf).
Outline of What to Expect:
Here is how we should generally approach the development of our code for our dApp smart contract:
-
Determine our contract entry points and use them to develop our
.protofile. -
Generate a boilerplate using our entry points.
-
Copy the boilerplate file and begin developing our entry point logic.
What is an entry point?
Smart contracts perform actions given specific user inputs. These inputs are known as an entry point. In other words, entry points are how all interactions with the blockchain begin and end.
How does data flow once received through an entry point?
When a user interacts with the specific entry point, the information is processed by the smart contract's logic and a response is provided. Our smart contract may consist of several different layers of code during development and may even be written in several languages. To manage the flow of information, we serialize the data using protobufs in a .proto file.
Because every interaction with a smart contract involves entry points, it is convenient to begin developing our entry points first.
Determining our contract entry points
Here is the portion of the code we will review with our entry points:
syntax = "proto3";

package gamestats;

import "koinos/options.proto";

message empty_message {}

// @description Initialize the contract
// @read-only false
// @result empty_message
message initialize_arguments {
   bytes rewards_token_address = 1 [(koinos.btype) = CONTRACT_ID];
}

// @description Submit game stats
// @read-only false
// @result empty_message
message submit_game_stats_arguments {
   game_stats_object game_stats = 1;
}

// @description Return a player's info
// @read-only true
// @result player_object
message get_player_info_arguments {
   bytes player = 1 [(koinos.btype) = ADDRESS];
}

// @description Return the leaderboard
// @read-only true
message get_leaderboard_arguments {
   leaderboard_key offset_key = 1;
   uint64 limit = 2 [jstype = JS_STRING];
   bool least_to_most_wins = 3;
}

message get_leaderboard_result {
   repeated leaderboard_key leaderboard = 1;
}

// @description Return the past games stats
// @read-only true
message get_games_stats_arguments {
   game_stats_key offset_key = 1;
   uint64 limit = 2 [jstype = JS_STRING];
   bool oldest_to_newest = 3;
}

message get_games_stats_result {
   repeated game_stats_object games_stats = 1;
}

// objects
message metadata_object {
   bool initialized = 1;
   bytes rewards_token_address = 2 [(koinos.btype) = ADDRESS];
   uint64 last_game_id = 3;
}

message game_stats_key {
   uint64 game_id = 1;
}

message game_stats_object {
   uint64 game_id = 1 [jstype = JS_STRING];
   uint64 timestamp = 2 [jstype = JS_STRING];
   uint64 rewards = 3 [jstype = JS_STRING];
   bytes winner = 4 [(koinos.btype) = ADDRESS];
}

message leaderboard_key {
   uint32 wins = 1;
   bytes player = 2;
}

message player_object {
   uint32 wins = 1;
}

// events-
message empty_message {}- This is a special type of entry point that you will see often. Protobufs allow us to use an entry point as a response or argument to another entry point therefore, if there is no error during the interaction, providing an empty message is sufficient. The usage is as follows: -
message initialize_arguments {}- This is a common entry point for contracts that require some initial data to begin working. In our dApp, when the gamestat contract is initialized we must provide the smart contract with the wallet address of our reward token, which will be uploaded as an independent smart contract. This is done because we don't know to which address the reward token contract will be uploaded to. -
message submit_game_stats_arguments {}- This entry point is used to store data. The required argument is the game_stats_object which contains whatever gamestats we want to include. We can make as many required arguments as we wish but only need 1 for our dApp. -
message get_player_info_arguments {}- Since we are creating a leaderboard, we need to store the player addresses over many games. The required argument is the player's address. -
message get_leaderboard_arguments {}andmessage get_leaderboard_result {}- Theget_leaderboard_argumentsentry point is used to retrieve information to generate a leaderboard. Instead of expecting anempty_messageas a response, we createdget_leaderboard_resultthat provides the leaderboard_key. Note, that the values 1, 2, and 3 are the serial numbers relating to google protobufs and not a value. -
message get_games_stats_arguments{}andmessage get_games_stats_result {}- This entry point is used to pull records of previous game statistics so they can be updated during the next game. Instead ofempty_message, the response isget_games_stats_results. This entry point is useful for the front end of our dApp. -
metadata_object- stores basic information relating to the dApp such as the initialization state (true/false), the address of the reward token from theinitializeentry point, and the id of the previous game. -
game_stats_key- stores the current game id. -
game_stats_object- Stores the game_id, the time of the game, how many tokens are to be rewarded, and who the winner is. -
leaderboard_key- Stores the winning player's wallet address and how many times they've won. -
player_object- Stores the winning player.
Note: Objects should be defined in the .proto file so they can be used by the business logic.
GENERATE THE BOILERPLATE
Once our game-stat entry points are defined in our .porto file, we'll run yarn build:release and generate the Gamestats.boilerplate.ts file from the /assembly directory which incorporates all of our entry points. We'll copy the boilerplate and rename it Gamestats.ts and develop our code on this new file.
Our boilerplate will look as follows:
import { System, Protobuf, authority } from "@koinos/sdk-as";
import { gamestats } from "./proto/gamestats";

export class Gamestats {
  initialize(args: gamestats.initialize_arguments): gamestats.empty_message {
    // const rewards_token_address = args.rewards_token_address;

    // YOUR CODE HERE

    const res = new gamestats.empty_message();

    return res;
  }

  submit_game_stats(
    args: gamestats.submit_game_stats_arguments
  ): gamestats.empty_message {
    // const game_stats = args.game_stats;

    // YOUR CODE HERE

    const res = new gamestats.empty_message();

    return res;
  }

  get_player_info(
    args: gamestats.get_player_info_arguments
  ): gamestats.player_object {
    // const player = args.player;

    // YOUR CODE HERE

    const res = new gamestats.player_object();
    // res.wins = ;

    return res;
  }

  get_leaderboard(
    args: gamestats.get_leaderboard_arguments
  ): gamestats.get_leaderboard_result {
    // const offset_key = args.offset_key;
    // const limit = args.limit;
    // const least_to_most_wins = args.least_to_most_wins;

    // YOUR CODE HERE

    const res = new gamestats.get_leaderboard_result();
    // res.leaderboard = ;

    return res;
  }

  get_games_stats(
    args: gamestats.get_games_stats_arguments
  ): gamestats.get_games_stats_result {
    // const offset_key = args.offset_key;
    // const limit = args.limit;
    // const oldest_to_newest = args.oldest_to_newest;

    // YOUR CODE HERE

    const res = new gamestats.get_games_stats_result();
    // res.games_stats = ;

    return res;
  }
}
CLONE THE BOILERPLATE FILE
To prepare for the second part of this guide, copy the Gamestats.boilerplate.ts and rename it Gamestats.ts. This file is where the bulk of our contract code will reside.
PRO TIP! During your development process, you may find that you must add new entry points to your .proto file. If you do this, regenerate the boilerplate by running yarn build:release and copy the new entry points back into your production file.
BUILDING OUR GAMESTAT SMART CONTRACT PART 2
We're now ready to develop the Gamestats.ts file located in the assembly directory which contains the core smart contract logic of our dApp. Let's quickly recap the logical behavior:
-
Gamestats.tscontains the core business logic and uses an on-chain database to manage information about the winners. It also sends a mint command to the reward token contract based on the current game's winner. -
On chain storage, such as player information, game statistics, and leaderboard information are stored on chain based on the logic coded into the
GameStatsStorage.ts,LeaderboardStorage.ts,MetadataStorage.tsandPlayerStorage.tsfiles.
In summary, we have one file to manage the logic (Gamestats.ts), and several files (GameStatsStorage.ts, LeaderboardStorage.ts, MetadataStorage.ts, and PlayerStorage.ts) to manage on-chain state. This is a common framework among smart contracts no matter what language is used.
BUILD OUR GAMESTAT CONTRACT (PART 1: EXPORT CLASS)
Now that we generally understand the organization of our code, we'll deep dive into the logic behind our dApp's Gamestats.ts code. The full code can be found here: https://github.com/koinos/1-week-challenge/blob/master/contracts/game-stats/assembly/Gamestats.ts
Our Gamestat.ts file contains an exportable class that contains
_contractID
In most cases, the developer will not know which wallet address their contract will be uploaded to. Since the wallet address is necessary in many situations, we create a variable called _contractID of Uint8Array type and call the System class from the @koinos/sdk-as module. The System class allows us to communicate with the blockchain itself (such as identifying the address) so it is an important class to understand. Read more about the System class here: https://koinos.github.io/koinos-sdk-as/modules/System.html
_metadataStorage, _playersStorage, _gameStatsStorage & _leaderboardStorage
Since we're storing information on-chain, we'll need to instantiate the memory state first. Recall in Module 7: Managing Storage Space on Chain how to do this. We simply instantiate the memory within our export statement.
initialize(args: gamestats.initialize_arguments): gamestats.empty_message {}
The initialize entry point is useful in many contracts to inject data necessary for the contract to function. Our use case is to inject the address of the reward token. To do this we use System.requireAuthority to ensure that no one but the contractId (itself) can define the reward token.
We also use System.require to check if this initialization has already been completed because we only want it to be done once.
submit_game_stats(args: gamestats.submit_game_stats_arguments): gamestats.empty_message {}
The majority of the Gamestat logic is located at this entry point. Here we call the database to create or grab objects and then store various game statistics such as the gameid, the leaderboard, and the winner's address.
**PRO TIP!**Assembly Script can overflow and underflow when performing mathematical operations using certain types of number systems such as u64. When you are not certain of the maximum value that your function will reach, it is advisable to use SafeMath which is provided to us in the @koinos/sdk-as module. Beware that SafeMath requires more Mana than built-in mathematical operations provided by Assembly Script, so use it only when you are handling sensitive information, such as incrementing the gameId which is involved in the minting of the reward token.
With all of the databases updated, we submit the data to game_stats.
Lastly, we mint our token for the winner. To do this, we use the Token helper which we imported from @koinos/sdk-as, see more information here: https://koinos.github.io/koinos-sdk-as/classes/Token.html.
Note: The token contract is based on a standard so we know which entry points are available.
The minting uses System.require to ensure that the game_stats contains the winner and the number of tokens to be rewarded, otherwise, it returns a fail message.
get_player_info(args: gamestats.get_player_info_arguments): gamestats.player_object {}
Used by the front end to display certain types of information.
get_leaderboard(args: gamestats.get_leaderboard_arguments): gamestats.get_leaderboard_result {}
Used by the front end to display certain types of information.
get_games_stats( args: gamestats.get_games_stats_arguments): gamestats.get_games_stats_result {}
Used by the front end to display certain types of information.
CONCLUSION
Our Gamestats.ts file is now ready for compilation! Next, we'll review our reward token contract.
CONFIGURING THE TOKEN SMART CONTRACT
Our dApp uses a reward token that follows a standard. Launching a token on Koinos is easy and discussed in Module 6.
We can simply clone the token contract standard and rename our token. Build the contract as mentioned in Module 6 and upload it to a wallet address and use that address initialize the gamestat contract!
Simple!